How to Pressure Wash Wood Surfaces Without Causing Damage
Wood is one of the most rewarding surfaces to clean — and one of the easiest to damage if technique is wrong. Unlike concrete, which tolerates high PSI and direct impact without harm, wood fiber responds to pressure washing force the way it responds to any mechanical stress: it can splinter, raise grain, embed water, accelerate decay, or strip the surface layer that holds stain and sealant. In Tallahassee’s humid climate, where decks, fences, and wood siding take biological punishment from year-round moisture and organic debris, knowing how to clean wood correctly makes the difference between a restored surface and a damaged one that needs sanding or replacement.
PSI Ranges for Different Wood Types
The single most important variable in pressure washing wood is PSI. Get it right and you remove years of mildew, gray oxidation, and embedded grime without touching the wood fiber. Get it wrong and you raise the grain, create furry texture, or blow through the surface entirely on softer species. General PSI guidelines for wood pressure washing:
- Hardwood decking (ipe, teak, mahogany): 1,500–2,000 PSI with a 40° tip, maintaining 12–18 inch standoff distance
- Pressure-treated pine decking: 1,200–1,800 PSI with a 40° tip. Pine is softer than hardwoods and raises grain more easily.
- Cedar and redwood: 1,000–1,500 PSI maximum. These species are prized for their appearance and relatively soft surface — excessive force visibly roughens the grain.
- Composite decking: 1,500–2,500 PSI, but always verify manufacturer specs — some composite products prohibit pressure washing entirely.
- Wood siding (horizontal lap or board-and-batten): 800–1,200 PSI with a 40° tip, working with the grain and never forcing water up behind overlapping boards.
- Wood fences (privacy panels, pickets): 1,200–1,800 PSI, paying attention to weathered sections where individual boards may be thinner or more fragile.
These PSI ranges assume a commercial gas-powered machine. Consumer-grade electric units often post lower PSI that won’t achieve these numbers — but don’t assume lower equals safer; an electric unit at 1,800 PSI with a 15° yellow tip is more damaging to wood than a commercial unit at 1,500 PSI with a 40° white tip because nozzle angle concentrates force more aggressively than the PSI number alone indicates.
Nozzle Selection for Wood
For wood surfaces, the 40° white nozzle tip is the standard choice. It provides the widest fan pattern in the standard nozzle set, distributing force over a larger area and reducing the concentrated impact on any single grain. A 25° green tip — appropriate for concrete — is too aggressive for most wood species and will raise grain and leave track marks. The 15° yellow tip has no place on wood. A 0° red tip should never be used on wood under any circumstances.
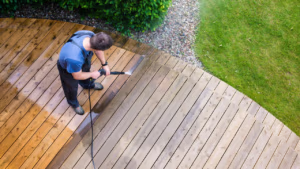
Hold the nozzle at a consistent 8–18 inch standoff from the wood surface, angled to work with the grain direction rather than across it. Moving across the grain creates furring and uneven surface texture. Moving with the grain (down the length of a deck board or along the run of a fence picket) cleans more effectively and maintains surface smoothness. Use overlapping passes rather than trying to clean each board in a single swipe — overlapping 30–40% prevents uneven cleaning lines.
Chemical Pre-Treatment for Wood
Tallahassee wood surfaces deal with two main contaminants beyond dirt: biological growth (algae, mildew, moss) and gray oxidation (UV weathering of the surface lignin). Chemical pre-treatment addresses both more effectively than pressure alone.
Biological Growth: Sodium Hypochlorite or Oxygen Bleach
Sodium hypochlorite at 0.5–1.0% concentration kills algae and mildew on wood effectively. Apply through a downstream injector with a soap tip (65° black nozzle) at low pressure, allow 5–10 minutes of dwell time, then pressure wash with the 40° tip. SH at these concentrations is safe for pressure-treated pine but can lighten some hardwoods slightly — test on an inconspicuous section if appearance consistency is important.
Oxygen bleach (sodium percarbonate) is a gentler alternative that’s particularly appropriate for cedar and redwood decks where color preservation matters. It whitens and brightens wood without the potential lightening effect of chlorine bleach. Mix to manufacturer spec, apply, allow 20–30 minutes dwell time, and pressure wash at low PSI.
Gray Oxidation: Wood Brightener
Wood brighteners — typically oxalic acid or citric acid-based products — reverse the gray weathering caused by UV exposure and tannin staining. A pressure-treated pine deck that’s been weathering gray for 3–5 years in Tallahassee’s climate can be returned to near-original warm tan color with a proper brightener application after pressure washing. Apply brightener after the cleaning pass when the wood is wet but the major contaminants have been removed. Allow to work for 10–15 minutes, then rinse at low pressure.
Brightener is particularly valuable as the prep step before staining or sealing a deck. New stain penetrates clean, open wood fiber dramatically better than stain applied over weathered gray oxidation — the color is richer, the penetration is deeper, and the finish lasts significantly longer.
Moisture: The Factor That Determines What Comes Next
Pressure washing drives water deep into wood fiber. Wood needs to dry completely before stain, sealant, or any coating is applied — typically 48–72 hours in Tallahassee’s humidity. Rushing this step is the most common reason deck staining fails prematurely: wet wood won’t absorb stain properly, the coating sits at the surface, and it peels within one to two seasons rather than lasting 3–5 years as it should.
In North Florida’s climate, plan for a minimum of 48 hours of dry weather after cleaning before applying any coating. Check the forecast — if rain is expected within 48 hours of the cleaning date, push the sealing appointment until after a clear window opens. Moisture content below 15% is the target before applying any penetrating wood finish.
When to Clean vs. Sand vs. Replace
Pressure washing restores wood in good structural condition that has surface-level contamination and weathering. It won’t fix wood that’s soft, punky, cracked through, or structurally compromised. Before scheduling a deck cleaning, walk the surface and probe suspect boards with a screwdriver tip — if it penetrates easily into soft wood, those boards need replacement, not cleaning. Cleaning soft, rotted wood accelerates its deterioration rather than helping it.
For decks with heavy checking (long grain cracks) and significant surface erosion from years of weathering, sanding after pressure washing produces better results before coating than pressure washing alone. A random orbital sander with 60–80 grit removes the most weathered surface layer, closes surface checks, and creates a uniform surface for stain penetration. This two-step approach — professional cleaning followed by sanding before staining — is the standard preparation for deck refinishing projects in Tallahassee where the deck is structurally sound but needs cosmetic restoration.
Professional Service for Tallahassee Decks, Fences, and Wood Siding
Wood cleaning is one of the services homeowners most frequently attempt DIY and most frequently regret — raised grain, pressure marks across boards, and water-damaged sections are common consequences of applying concrete technique to wood surfaces. Professional crews familiar with North Florida wood surfaces and the specific pressures, tips, and chemistry each surface type requires deliver results that last and set the surface up correctly for sealing or staining.
Around the Bend Pressure Washing serves Tallahassee and surrounding areas including Bradfordville, Killearn Estates, Killearn Lakes, Southwood, Midtown, Waverly Hills, Ox Bottom, Crawfordville, Woodville, Quincy, and Midway. For deck cleaning, fence restoration, or wood siding washing, call 850-888-2105. We’ll assess your specific wood surfaces and give you a straightforward recommendation on cleaning approach, appropriate timing, and what preparation is needed for sealing or staining if that’s part of your plan.